Thursday, July 18, 2013
Haven't been posting here much.
I haven't been posting here much. Honestly, with summer here I just haven't been researching a lot about photography. I have been getting out taking pictures though and posting them to my Tumblr. As soon as the weather cools off and I start to hibernate for the winter again, I'll be posting some links and tutorials and stuff. Anyone interested can check out my tumblr here.

Friday, May 3, 2013
Use Gimp To Turn A Color Photo Black And White And Add Fog.
Here's two tutorials I used to turn a color photo taken on a sunny day into a darker goth style image using Gimp. This is the original photo taken in a cemetery on a fairly sunny day.
 Using the tutorial found at the Gimp website. I changed this to this.
 I also made some slight adjustments using Colors/brightness-contrast.Then using the tutorial found at gimpguru. I added some fog.
 The entire process took under 20 minutes, and changed a bright sunny day into a darker Gothic style seen.


Wednesday, March 6, 2013
Daily Pic, First Photo With Light Tent
So I didn't do the DYI light tent. I ended up buying one at the local camera store. Knowing how I am, I figured I would of spent close to as much as I paid for a new one. More on that in another post when there's more time to write. For now here is the first photo I took with the new light tent !
 I'm using the light tent to shoot jewelry but thought I'd try this first. I took a few shots of jewelry and they came out o.k. When I set it up at the job and start shooting , I'll post some pictures and how I shot them.

Sunday, March 3, 2013
DYI Projects
Whenever I do a DYI project it ends up costing me almost as much as
if I would go out and by the finished product. Over the next week I plan
on building a small light box / light tent for taking pictures of
jewelry. I'm doing research on the project, and trying to make it as
durable and affordable as possible.
I've seen a few different plans with some cheap solutions. So I think I'm going to combine a few DYI instructions and try to come up with something cool. I'll post the tutorial here, along with some pictures and different ideas. Hopefully this doesn't end up costing me more than if I just purchased the damn thing from the store :)
I've seen a few different plans with some cheap solutions. So I think I'm going to combine a few DYI instructions and try to come up with something cool. I'll post the tutorial here, along with some pictures and different ideas. Hopefully this doesn't end up costing me more than if I just purchased the damn thing from the store :)
Wednesday, February 27, 2013
Product Review Ravelli APLT4 61-inch Aluminum Tripod With Bag
 |
| Test shot taken with the Ravelli tripod. |
I ordered the Ravelli APLT4 61-inch lightweight Aluminum Tripod With Bag. This is a really inexpensive tripod at a whopping $24.96. I was a little hesitant with the price being so cheap, but did some research and read great things about Ravelli so I decided to give it a try. I'm real happy with the decision I made.
I'm 6 foot 1 and the tripod is the perfect height for me. The tripod is very sturdy. This should be perfect for the jewelry I want to photograph. The tripod extends to a little over 61 inches, there is a center gear that extends it an additional 11" and makes it just the right height for me, and it collapses to 24 inches. It also comes with a carry bag, that I thought was a little flimsy but should be nice when I decide to take it on a nature hike, or use it for some outdoor photography. Hey, for $24.96 this was money well spent.
The tripod features a 3 axis head (included), a geared center mount, 2 bubble levels, adjustable legs extending from 24 inches to a little over 61 inches plus the 11 inches gained using the center gear, and the legs are attached to rubber feet which help keep the tripod from slipping and gives it a nice sturdy hold on the ground.
I set up the tripod, took a couple shots with it, and I have to say I'm really happy with this purchase !
I ordered the tripod from Amazon. I love dealing with Amazon, but it kind of bothered me that the tripod was priced at $24.96 and not $25.01. The price of $24.96 made it 5 cents under to qualify for free shipping. I ended up buying another item for around 6 bucks to qualify for the free shipping. I'll be reviewing that shortly. No big deal really.
Over all, I'm pretty happy with the investment I made. If your looking for an inexpensive, sturdy camera tripod I would highly recommend the Ravelli APLT4 61-inch tripod. You can click the image below to find out more about this product and read other customer reviews.
A Quick Update.
Things have been pretty crazy, and I just haven't had time to update the blog, not to mention a small lack of content. I just haven't been taking any photo's worth posting, and would rather not post just for the sake of posting. I've been doing some commercial work for the family business. I also do web and graphic design, and have been setting up a website for my mom's retail store. It's just getting started but if your interested the site is here . http://mostly-jewelry.com/
That's been keeping me pretty busy, and I just haven't had time to post pictures, and honestly I just haven't had time to take pictures :( I will be taking product pictures shortly though, and will post some of those here, along with some info on how I took them.
I have to take pictures of jewelry, I think I'm going to use my 55 - 200 mm lens, use a tripod, and zoom in on the jewelry. I took some test shots without a tripod and they looked nice, but without the tripod I just couldn't get the sharpness I was looking for. I ordered a tripod from Amazon, and it arrived today so I should have some jewelry pictures to add here shortly.
That's been keeping me pretty busy, and I just haven't had time to post pictures, and honestly I just haven't had time to take pictures :( I will be taking product pictures shortly though, and will post some of those here, along with some info on how I took them.
I have to take pictures of jewelry, I think I'm going to use my 55 - 200 mm lens, use a tripod, and zoom in on the jewelry. I took some test shots without a tripod and they looked nice, but without the tripod I just couldn't get the sharpness I was looking for. I ordered a tripod from Amazon, and it arrived today so I should have some jewelry pictures to add here shortly.
Sunday, February 17, 2013
Fix a crooked image in Gimp 2.8
So you took a photo, it's not a great image, but it's not a bad one either. However, the angle is just way off. Today we use Gimp to adjust the angle, and remove some clutter from the photo.
We can accomplish this process in about four easy steps. We will need the Rectangle Select Tool, the Rotate Tool, then Image crop to selection, these are all circled in the below diagram.
O.K. first open the crooked image that needs to be straightened out in Gimp. Now click on the "Rotate Tool", and then click on the image. A grid should appear and a new box with a slider, slide the slider till the image is in it's desired position. If you did this correctly the image should now be cocked at an odd angle, but your line of focus should now be straight and even.
Now click on the "Rectangle Select Tool", figure out how you want to center the image, and then start at the top right of your center point and drag it down to the bottom left. Be careful that you don't get any of the transparent background in the corners when you drag it.
Now go to Image, Crop To Selection, and your done ! To save the image go to File, export, then name your new image and save it as filename_edit.jpg or whatever you want to name your new and improved image.
Hope this helped, thanks for reading, and happy photographing !
Bloggers note : I was doing some housework the other day, and just snapping random shots with my new camera trying to learn some of the different features. After I hung up these new curtains, the cat was really curious about the alien hanging out in his favorite window. I just snapped a quick shot, and the angle was terrible but I thought it was a really cute photo of the cat. It gave me a great excuse to write a tutorial today though. Hoped it helped.
We can accomplish this process in about four easy steps. We will need the Rectangle Select Tool, the Rotate Tool, then Image crop to selection, these are all circled in the below diagram.
 |
| You can click this image to enlarge. Everything you need should be circled. |
 |
| Here's the crooked image, notice the angle and also the clutter of wires on the floor.After we edit this in Gimp, the image will have a straight center of focus, and when we crop the image we will have removed the mess of wires on the floor, giving us a cleaner more centered image. |
Now click on the "Rectangle Select Tool", figure out how you want to center the image, and then start at the top right of your center point and drag it down to the bottom left. Be careful that you don't get any of the transparent background in the corners when you drag it.
Now go to Image, Crop To Selection, and your done ! To save the image go to File, export, then name your new image and save it as filename_edit.jpg or whatever you want to name your new and improved image.
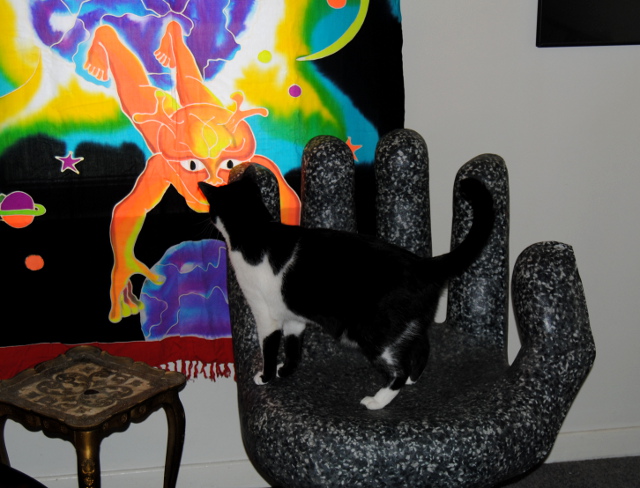 |
| The image now has a proper angle, the ugly wires were removed when we cropped the image, and the focus of attention is on the subject matter. |
Bloggers note : I was doing some housework the other day, and just snapping random shots with my new camera trying to learn some of the different features. After I hung up these new curtains, the cat was really curious about the alien hanging out in his favorite window. I just snapped a quick shot, and the angle was terrible but I thought it was a really cute photo of the cat. It gave me a great excuse to write a tutorial today though. Hoped it helped.
Subscribe to:
Posts (Atom)