Showing posts with label gimp tutorial. Show all posts

Sunday, February 17, 2013

Fix a crooked image in Gimp 2.8

So you took a photo, it's not a great image, but it's not a bad one either. However, the angle is just way off. Today we use Gimp to adjust the angle, and remove some clutter from the photo.

We can accomplish this process in about four easy steps. We will need the Rectangle Select Tool, the Rotate Tool, then Image crop to selection, these are all circled in the below diagram.

You can click this image to enlarge. Everything you need should be circled.
 O.K. first open the crooked image that needs to be straightened out in Gimp. Now click on the "Rotate Tool", and then click on the image. A grid should appear and a new box with a slider, slide the slider till the image is in it's desired position. If you did this correctly the image should now be cocked at an odd angle, but your line of focus should now be straight and even.

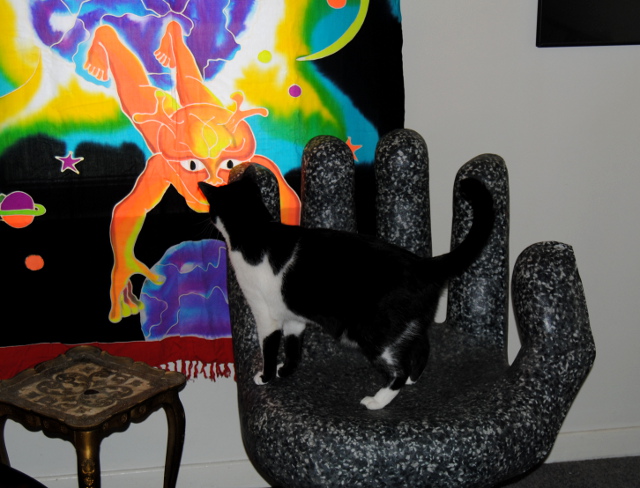
Here's the crooked image, notice the angle and also the clutter of wires on the floor.After we edit this in Gimp, the image will have a straight center of focus, and when we crop the image we will have removed the mess of wires on the floor, giving us a cleaner more centered image.

Now click on the "Rectangle Select Tool", figure out how you want to center the image, and then start at the top right of your center point and drag it down to the bottom left. Be careful that you don't get any of the transparent background in the corners when you drag it.

Now go to Image, Crop To Selection, and your done ! To save the image go to File, export, then name your new image and save it as filename_edit.jpg or whatever you want to name your new and improved image.

The image now has a proper angle, the ugly wires were removed when we cropped the image, and the focus of attention is on the subject matter.
 Hope this helped, thanks for reading, and happy photographing !

Bloggers note : I was doing some housework the other day, and just snapping random shots with my new camera trying to learn some of the different features. After I hung up these new curtains, the cat was really curious about the alien hanging out in his favorite window. I just snapped a quick shot, and the angle was terrible but I thought it was a really cute photo of the cat. It  gave me a great excuse to write a tutorial today though. Hoped it helped.

Monday, January 21, 2013

Using Gimp To Enhance Brightness Contrast

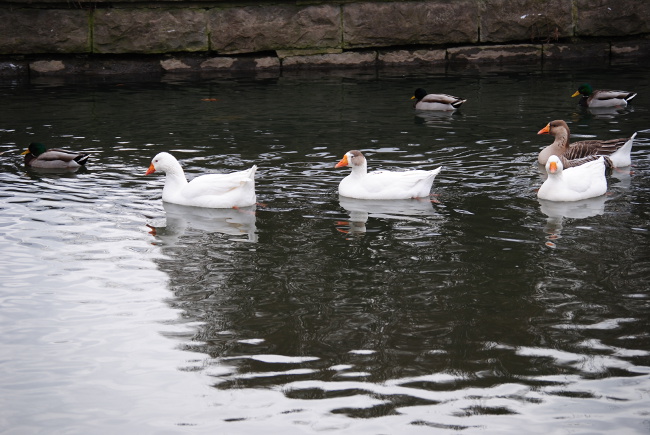
I snapped some images of ducks the other day. I thought I would post a quick tutorial on using Gimp, to adjust the contrast and brightness of a photo.

Adjusting the contrast and brightness of a photograph in Gimp is a great way to make some subtle changes to a photo. By adjusting the contrast you can give the image a slightly richer look. This will lighten or darken the image, and also help bring out or remove some of the shadows. I also feel it helps to slightly enhance some of the colors.

This is a really simple process to do, and worth the 2 or 3 minutes it takes to do. The screen shot shows you where to go in Gimp. You can use your own photo or download the original unedited duck photo here at 4shared. The original file is jpeg, 2.3 megabytes, and 3872 x 2592. If you look at the before and after of this picture, the changes are very subtle and barely noticeable. However when you load an image in Gimp and try this for yourself you will see exactly what I'm talking about.

O.K., open Gimp and load either your image or my image into it. Now click on colors, and then find brightness - contrast. Click on brightness - contrast and when the dialog box opens, set the sliders as shown in the screenshot, or however you think they look nice. Your done. Quick, painless, it took less than 2 minutes, and added a little special something to your image. I'm currently doing this to just about every image I process. When your done, click file, export, and then export the image as whatever-filename.jpg.Here are the before and after pix,very subtle and barely noticable with the naked eye. As an amateur photographer though, we can use all the extra help we can get. Play around with different images using this technique and you'll be surprised at what this little adjustment can do for some of your pictures.
After changes, you can see the difference in the rocks, the shadowing in the corners, and also a little more color in the bills of the ducks
.original
Thanks for reading and happy photographing.

Monday, January 7, 2013

Tutorial Create A Polaroid In Gimp

This is an easy tutorial that will teach you how to make any photo you take look like it was taken with an old Polaroid camera using Gimp 2.8. You will need an edit of a Polaroid which you can download here, and the photo you want to turn into a Polaroid.

I was designing a header for the Google Plus page I created for the blog. I thought a design using an old Polaroid shot would be fun. You can't get more amateur than the old Polaroid. So I searched the internet, found a scan of an old Polaroid, threw it in Gimp 2.8 and this is what I came up.

I use Gimp for a couple of reasons, mainly because it doesn't cost me anything, but also because I've used it for some time now and find it every bit as good as Photoshop or some of the other photo editing software out there. More on that in another post. If you know how to use Photoshop, this is a really easy tutorial and you should be able to do everything I show you here in Photoshop, no problem !
Stock photo supplied by:http://lured2stock.deviantart.com/art/Polaroid-3262470

O.K first thing you need to do is download the edit of the Polaroid I found. You can either download mine, or if you want to edit your own, click here. Now you need to open it in Gimp or Photoshop or whatever program your using. Once you load the graphic your only going to need to use two buttons to create this effect. The scale image button, and the rectangle tool. both shown in this graphic.
The buttons you will need to use are circled here.

Now you have your Polaroid image loaded in Gimp, this is the trickiest part of the tutorial, if you can achieve this I'm pretty sure your going to achieve success. Click on the rectangle tool and make a rectangle around the black part of the Polaroid by clicking on the upper left hand corner of the black square and then dragging it down to the lower right hand part of the square. You should now have the marching ants or whatever you want to call them around the black part of the Polaroid. Now go to the top of the program where it says file, edit, select, view, etc. and click on edit, then copy.

Now open the image you want to turn into a Polaroid, and click edit, paste as, new layer. This should give you two layers, one of the original image, and the other of the black box. The image must be larger than the black box. If it's not, you can either find an image that is or scale the Polaroid image down a bit and start over. I'll explain how to scale next.

O.K. if the image is larger than the black box, which it should be, go to the right of the screen, and in your layers box move the bottom layer of the photo above the black box layer. Now click on the scale tool to the left of the screen, click on the image that we're scaling and when the image is covered with the grid, click on the upper left hand corner and scale it down to the size of the black box in the layer below. Once you have it the proper size, go to edit, and select cut. (If your image wasn't larger than the black box, use this procedure to scale the Polaroid down a bit and start over.)

Now go back to the image of the complete Polaroid, click edit paste as new layer. This should paste the image into the Polaroid and it should be the same size as the black box now. If you have to reposition the new layer, just click on the move tool, which I forgot to highlight, sorry :( It's the button that looks like a plus sign made of arrows, it's the second button above the scale tool in my screen shot. Click on that then click on the image layer and position it into the black box. That's it your done. If your scale is off a little just click the scale tool again and adjust the image layer a bit more to fit the black box inside the Polaroid pic.

If I explained this properly, you should have something that looks like the following image.
This finished product.
Hopefully you found this tutorial helpful. I hope I didn't make it more complicated than it needs to be. The site is amateur photography, and I never claimed to be a Gimp pro either. If the tutorial worked out for you, leave a comment and let me know. If you thought this tutorial sucked, leave a comment and let me know and maybe I can adjust it so it's not so sucky. Thanks for reading and feel free to follow on blogger, or G+ !

Credits : Image of Polaroid taken from http://lured2stock.deviantart.com/art/Polaroid-3262470 Stop by there and check out some of the other stock photos they have, or drop them a comment of gratitude.