 | |
| A huge Turkey hanging out in the cemetery. |
Wednesday, January 30, 2013
Daily Photo - What A Turkey !
Found this guy hanging out in the cemetery. This had to be the biggest Turkey I ever saw.
Thursday, January 24, 2013
After The Snow

This is one of the first photos I took with my camera that I was happy with. I decided to try and do a daily photo for the blog. This way I'll have a time frame journal of how I improve or digress.
Monday, January 21, 2013
Using Gimp To Enhance Brightness Contrast
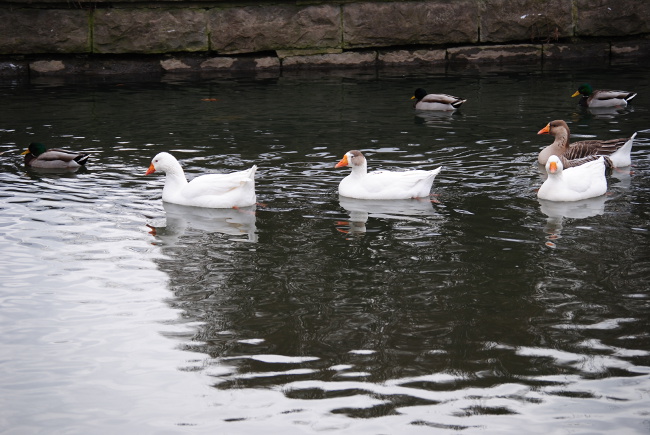
I snapped some images of ducks the other day. I thought I would post a quick tutorial on using Gimp, to adjust the contrast and brightness of a photo.
Adjusting the contrast and brightness of a photograph in Gimp is a great way to make some subtle changes to a photo. By adjusting the contrast you can give the image a slightly richer look. This will lighten or darken the image, and also help bring out or remove some of the shadows. I also feel it helps to slightly enhance some of the colors.
This is a really simple process to do, and worth the 2 or 3 minutes it takes to do. The screen shot shows you where to go in Gimp. You can use your own photo or download the original unedited duck photo here at 4shared. The original file is jpeg, 2.3 megabytes, and 3872 x 2592. If you look at the before and after of this picture, the changes are very subtle and barely noticeable. However when you load an image in Gimp and try this for yourself you will see exactly what I'm talking about.

O.K., open Gimp and load either your image or my image into it. Now click on colors, and then find brightness - contrast. Click on brightness - contrast and when the dialog box opens, set the sliders as shown in the screenshot, or however you think they look nice. Your done. Quick, painless, it took less than 2 minutes, and added a little special something to your image. I'm currently doing this to just about every image I process. When your done, click file, export, and then export the image as whatever-filename.jpg.Here are the before and after pix,very subtle and barely noticable with the naked eye. As an amateur photographer though, we can use all the extra help we can get. Play around with different images using this technique and you'll be surprised at what this little adjustment can do for some of your pictures.
Thanks for reading and happy photographing.
Adjusting the contrast and brightness of a photograph in Gimp is a great way to make some subtle changes to a photo. By adjusting the contrast you can give the image a slightly richer look. This will lighten or darken the image, and also help bring out or remove some of the shadows. I also feel it helps to slightly enhance some of the colors.
This is a really simple process to do, and worth the 2 or 3 minutes it takes to do. The screen shot shows you where to go in Gimp. You can use your own photo or download the original unedited duck photo here at 4shared. The original file is jpeg, 2.3 megabytes, and 3872 x 2592. If you look at the before and after of this picture, the changes are very subtle and barely noticeable. However when you load an image in Gimp and try this for yourself you will see exactly what I'm talking about.

O.K., open Gimp and load either your image or my image into it. Now click on colors, and then find brightness - contrast. Click on brightness - contrast and when the dialog box opens, set the sliders as shown in the screenshot, or however you think they look nice. Your done. Quick, painless, it took less than 2 minutes, and added a little special something to your image. I'm currently doing this to just about every image I process. When your done, click file, export, and then export the image as whatever-filename.jpg.Here are the before and after pix,very subtle and barely noticable with the naked eye. As an amateur photographer though, we can use all the extra help we can get. Play around with different images using this technique and you'll be surprised at what this little adjustment can do for some of your pictures.
 | |
| After changes, you can see the difference in the rocks, the shadowing in the corners, and also a little more color in the bills of the ducks |
 |
| .original |
Friday, January 18, 2013
The Crow
I went out and took some pictures today. I snapped this and was really happy with how it came out. I've been playing around with my aperture, and still really don't understand what I'm doing. Every picture I took , I took with a high aperture and a low aperture, and somewhere in the middle. Except this bird. He was just flying by, I have no clue what my aperture was set at, and discovered this when I got home. I've got about four shots of him in various forms of flight and they all came out like this.


Monday, January 14, 2013
Exorcising Demon Deer Eyes
As I stated in my last post, I got lucky the other day and came across these deer. Unfortunately it was right at dusk, and I really don't know how to shoot in poor light. These deer were hanging out on the side of the road by a rest area, I pulled up and left my headlights on them and they just hung out. I grabbed my camera, stepped out of the car, and the little ladies let me walk right up to them. I was roughly about 10 feet away. Between using my flash, and the car headlights shining on them, I got some terrible pictures of some demon deer. I don't think they were demon, but red eye removal just wasn't going to fix these demon eyes.
I did some experimenting in Gimp 2.8 and figured out a decent way to remove the light from their eyes. This is really simple and if you use Photoshop you should be able to accomplish this same effect.
Here's how this works. Load the deer image in Gimp, or whatever photo editing program your using. Go to the layers box on the right and click add new layer. Towards the top of the program screen where it says file, edit, view, click on view, and then zoom to about 400%. Now click on the Ellipse tool, and make an ellipse around one of the bright dots in the deers eyes. Then hit the shift key and do the same to the other eye.
Now click on the color picker tool, and click it right on the outside of the circle you selected of one of the eyes. Click on the brush tool and fill the circle with the color you selected. Now repeat this process with the other eye.
Now go to the top of the program screen and click select none. Now click on the smudge tool, and make your brush size about 2 or 3 pixels. Now smudge the layer with just the eyes and little bit where there's a pixel or 2 you missed.Go over to the layers bar and adjust the opacity a bit until the color blends with the eyes. That's it your done. If you did everything correct you should have an image that looks like this.
This is a crude but effective fix. With a little practice I think you can see the potential this effect has. Hopefully I'll have some better pix to post soon. At least these photo's made for a decent tutorial.If your bored play around with the contrast and brightness a bit and see if you can adjust the light a bit better.
Thanks for reading and I hope this Gimp tutorial was helpful. Feel free to leave any comments positive or negative. Thanks for following and check back soon for updates.
 |
| Everything you need to use should be circled. |
I did some experimenting in Gimp 2.8 and figured out a decent way to remove the light from their eyes. This is really simple and if you use Photoshop you should be able to accomplish this same effect.
 |
| Look at that beauty, if I only got there 10 minutes earlier. The redeye removal filter wasn't going to fix this. |
Here's how this works. Load the deer image in Gimp, or whatever photo editing program your using. Go to the layers box on the right and click add new layer. Towards the top of the program screen where it says file, edit, view, click on view, and then zoom to about 400%. Now click on the Ellipse tool, and make an ellipse around one of the bright dots in the deers eyes. Then hit the shift key and do the same to the other eye.
Now click on the color picker tool, and click it right on the outside of the circle you selected of one of the eyes. Click on the brush tool and fill the circle with the color you selected. Now repeat this process with the other eye.
Now go to the top of the program screen and click select none. Now click on the smudge tool, and make your brush size about 2 or 3 pixels. Now smudge the layer with just the eyes and little bit where there's a pixel or 2 you missed.Go over to the layers bar and adjust the opacity a bit until the color blends with the eyes. That's it your done. If you did everything correct you should have an image that looks like this.
 |
| Crude but effective. With a little practice I think I could master this technique. |
This is a crude but effective fix. With a little practice I think you can see the potential this effect has. Hopefully I'll have some better pix to post soon. At least these photo's made for a decent tutorial.If your bored play around with the contrast and brightness a bit and see if you can adjust the light a bit better.
Thanks for reading and I hope this Gimp tutorial was helpful. Feel free to leave any comments positive or negative. Thanks for following and check back soon for updates.
Friday, January 11, 2013
Lens Cleaning Nikon Video Tutorial
So I bring my camera out today while I'm running some errands. It's raining, dark skies, poor light, I'm out all day and don't see one interesting thing to shoot in the type of day light I had to work with. I did notice a couple things that I'll shoot on a day with better light. Finally at about dusk I'm driving up a road and spot some deer. More on these lil dood's tomorrow. I get excited, grab my camera, set the lens cap on my lap while I'm making some quick adjustments to my camera, jump out of the car, and start taking pictures. The last of the light goes down, I hop back into my car, only to discover, I can't find my lens cap :(. I open the car door, and there next to the car is my lens cap covered in mud. NOT COOL !
I blow it off, stick the camera in my bag, and head home. When I get home I clean the lens cap with a new toothbrush to get all the dirt out of the crevices of the the lens cap, run it under water and stick it in the dish drainer to dry it off. I wipe off the lens with the soft part of my sweater, place a plastic bag over the lens while the caps drying and I'm done. WTF , I'm a newb, and at times a bit dumb, or at least do dumb things. This technique worked fine for me but I decided to look it up on the internet and see what the proper way to clean a lens, and lens cap would be. I found this video from Nikon on Youtube and thought I would share it here.
I get paid bi-weekly and am planning on spending a portion of my check every other week on camera equipment. I was planning on buying a tripod this week, but I ended up spending close to $100.00 on a service plan / camera insurance. The whole camera is covered and even if I drop a lens and break it , it gets replaced. Being the clumsy oaf I am at times, it sounded like a good idea. Next week I think I'll be investing in a cleaning kit. After today's fiasco it'll probably be money well spent !
Tuesday, January 8, 2013
Please Help Me !
Dear friends, fellow bloggers, and countrymen... Citizens of earth, and denizens of the world wide web. I call out to you in my hour of need, in hopes that someone ... anyone, might be able to help me with this monumental problem that must be solved !
This post will be tagged under advice and is slightly off topic, but I assure you there is a method to my madness.First let me show you the problem and quickly give you the advice part of this post.

This is an amateur photograph of a burrito. Not only is it an amateur photograph of a burrito, but it's also a crappy amateur photograph, of a very crappy burrito ! Why you might ask would the humble host of My Amateur Photo, post a crappy picture of a very crappy burrito ? For two reasons. One being the first bit of advice I was given when I got my camera and that was to take pictures of everything. That's just what I've been doing. I've taken pictures of dinner place settings, my parents, my pets, my food, the ground, the sky, the stars, and the moon, planes, trains, automobiles and anything else I could zoom in on ! The more pictures you take the more you will learn. I'm also finding this theory to be very true, I've learned a lot recently and occasionally snap a decent shot due to this advice. This crappy amateur photo, of this crappy burrito, is my proof to the world that I've been doing just that. Taking pictures of everything.

Now back to my problem. I live in New York state. I moved out west for a couple years and got used to real Mexican food. After tasting the heavenly deliciousness of real Mexican cooking, a standard New York state burrito just ain't cutting it. We have some of the best Italian restaurants, and some really good Puerto Rican cuisine, but we just can't figure out Mexican around here. After taking the crappy amateur photo of this very crappy burrito, it hit me like a ton of bricks ! Why not post the crappy picture of the crappy burrito on the internet in hopes that someone, anyone, might be able to point me to a webpage, or recipe site with a really good Mexican burrito recipe. FOR THE LOVE OF GOD,AND ALL THAT'S GOOD SOMEONE PLEASE HELP ME. It's been 10 years since I've had a real burrito.
I've looked at recipe sites, I've tried to make my own, and I just can't find the proper recipe. Somewhere on the WORLD WIDE WEB, there has to be an authentic Mexican burrito recipe, filled with rice, and beans, and delectable beef simmered in delicious herbs and spices. I hate to break it to you N.Y. but a burrito is not some fried ground beef, with a couple dashes of hot sauce, some lettuce, tomato and onion ! SOMEBODY PLEASE HELP ME.

Now this burrito came from a friends restaurant and in all fairness to the chef by N.Y. standards it's a pretty good burrito. Might possibly be the best burrito in the city I live in, it's just not West Coast Mexican cooking. If you should come upon this post, and you recognize this as your burrito, I ate the whole thing and by N.Y. standards it's not as bad as I'm making it out to be. It just really left me craving for that West Coast Mexican flavor.
On a closing note, if you've read this far, take pictures of everything. That's how you learn. The more pictures you take the more opportunities you will get to see how your camera operates in different light settings. What lens to use and so on and so forth. The more pix you take, the more you will learn, and the better your pictures will start to come out. ALL KIDDING ASIDE , IF I DON'T GET A REAL BURRITO SOON, I'M GONNA GO NUTS, SO IF YOU KNOW OF A WEB LINK TO A REAL MEXICAN BURRITO RECIPE PLEASE POST THE LINK IN THE COMMENTS. I assure you the God's will bless you repeatedly for this one act of kindness and I will be forever in your debt !
Monday, January 7, 2013
Tutorial Create A Polaroid In Gimp
This is an easy tutorial that will teach you how to make any photo you take look like it was taken with an old Polaroid camera using Gimp 2.8. You will need an edit of a Polaroid which you can download here, and the photo you want to turn into a Polaroid.
I was designing a header for the Google Plus page I created for the blog. I thought a design using an old Polaroid shot would be fun. You can't get more amateur than the old Polaroid. So I searched the internet, found a scan of an old Polaroid, threw it in Gimp 2.8 and this is what I came up.
I use Gimp for a couple of reasons, mainly because it doesn't cost me anything, but also because I've used it for some time now and find it every bit as good as Photoshop or some of the other photo editing software out there. More on that in another post. If you know how to use Photoshop, this is a really easy tutorial and you should be able to do everything I show you here in Photoshop, no problem !
O.K first thing you need to do is download the edit of the Polaroid I found. You can either download mine, or if you want to edit your own, click here. Now you need to open it in Gimp or Photoshop or whatever program your using. Once you load the graphic your only going to need to use two buttons to create this effect. The scale image button, and the rectangle tool. both shown in this graphic.
Now you have your Polaroid image loaded in Gimp, this is the trickiest part of the tutorial, if you can achieve this I'm pretty sure your going to achieve success. Click on the rectangle tool and make a rectangle around the black part of the Polaroid by clicking on the upper left hand corner of the black square and then dragging it down to the lower right hand part of the square. You should now have the marching ants or whatever you want to call them around the black part of the Polaroid. Now go to the top of the program where it says file, edit, select, view, etc. and click on edit, then copy.
Now open the image you want to turn into a Polaroid, and click edit, paste as, new layer. This should give you two layers, one of the original image, and the other of the black box. The image must be larger than the black box. If it's not, you can either find an image that is or scale the Polaroid image down a bit and start over. I'll explain how to scale next.
O.K. if the image is larger than the black box, which it should be, go to the right of the screen, and in your layers box move the bottom layer of the photo above the black box layer. Now click on the scale tool to the left of the screen, click on the image that we're scaling and when the image is covered with the grid, click on the upper left hand corner and scale it down to the size of the black box in the layer below. Once you have it the proper size, go to edit, and select cut. (If your image wasn't larger than the black box, use this procedure to scale the Polaroid down a bit and start over.)
Now go back to the image of the complete Polaroid, click edit paste as new layer. This should paste the image into the Polaroid and it should be the same size as the black box now. If you have to reposition the new layer, just click on the move tool, which I forgot to highlight, sorry :( It's the button that looks like a plus sign made of arrows, it's the second button above the scale tool in my screen shot. Click on that then click on the image layer and position it into the black box. That's it your done. If your scale is off a little just click the scale tool again and adjust the image layer a bit more to fit the black box inside the Polaroid pic.
If I explained this properly, you should have something that looks like the following image.
Hopefully you found this tutorial helpful. I hope I didn't make it more complicated than it needs to be. The site is amateur photography, and I never claimed to be a Gimp pro either. If the tutorial worked out for you, leave a comment and let me know. If you thought this tutorial sucked, leave a comment and let me know and maybe I can adjust it so it's not so sucky. Thanks for reading and feel free to follow on blogger, or G+ !
Credits : Image of Polaroid taken from http://lured2stock.deviantart.com/art/Polaroid-3262470 Stop by there and check out some of the other stock photos they have, or drop them a comment of gratitude.
I was designing a header for the Google Plus page I created for the blog. I thought a design using an old Polaroid shot would be fun. You can't get more amateur than the old Polaroid. So I searched the internet, found a scan of an old Polaroid, threw it in Gimp 2.8 and this is what I came up.
I use Gimp for a couple of reasons, mainly because it doesn't cost me anything, but also because I've used it for some time now and find it every bit as good as Photoshop or some of the other photo editing software out there. More on that in another post. If you know how to use Photoshop, this is a really easy tutorial and you should be able to do everything I show you here in Photoshop, no problem !
 |
| Stock photo supplied by:http://lured2stock.deviantart.com/art/Polaroid-3262470 |
O.K first thing you need to do is download the edit of the Polaroid I found. You can either download mine, or if you want to edit your own, click here. Now you need to open it in Gimp or Photoshop or whatever program your using. Once you load the graphic your only going to need to use two buttons to create this effect. The scale image button, and the rectangle tool. both shown in this graphic.
 |
| The buttons you will need to use are circled here. |
Now you have your Polaroid image loaded in Gimp, this is the trickiest part of the tutorial, if you can achieve this I'm pretty sure your going to achieve success. Click on the rectangle tool and make a rectangle around the black part of the Polaroid by clicking on the upper left hand corner of the black square and then dragging it down to the lower right hand part of the square. You should now have the marching ants or whatever you want to call them around the black part of the Polaroid. Now go to the top of the program where it says file, edit, select, view, etc. and click on edit, then copy.
Now open the image you want to turn into a Polaroid, and click edit, paste as, new layer. This should give you two layers, one of the original image, and the other of the black box. The image must be larger than the black box. If it's not, you can either find an image that is or scale the Polaroid image down a bit and start over. I'll explain how to scale next.
O.K. if the image is larger than the black box, which it should be, go to the right of the screen, and in your layers box move the bottom layer of the photo above the black box layer. Now click on the scale tool to the left of the screen, click on the image that we're scaling and when the image is covered with the grid, click on the upper left hand corner and scale it down to the size of the black box in the layer below. Once you have it the proper size, go to edit, and select cut. (If your image wasn't larger than the black box, use this procedure to scale the Polaroid down a bit and start over.)
Now go back to the image of the complete Polaroid, click edit paste as new layer. This should paste the image into the Polaroid and it should be the same size as the black box now. If you have to reposition the new layer, just click on the move tool, which I forgot to highlight, sorry :( It's the button that looks like a plus sign made of arrows, it's the second button above the scale tool in my screen shot. Click on that then click on the image layer and position it into the black box. That's it your done. If your scale is off a little just click the scale tool again and adjust the image layer a bit more to fit the black box inside the Polaroid pic.
If I explained this properly, you should have something that looks like the following image.
 |
| This finished product. |
Credits : Image of Polaroid taken from http://lured2stock.deviantart.com/art/Polaroid-3262470 Stop by there and check out some of the other stock photos they have, or drop them a comment of gratitude.
Sunday, January 6, 2013
First Lesson Learned
Well this is my first lesson learned, and a tip for anyone new taking up this hobby. The other day when I was out snapping a few photos I took this picture of the water tower. It's a terrible picture, I don't like the angle, it's cockeyed, and the worst part about it is the parking sign almost in the center of the photo all out of focus.
When I looked through the camera view finder A) I didn't notice the sign, or B) it looked o.k. thus I ignored it. I guess I have to start thinking like a camera when I shoot my photo's. When you look through the view finder ask yourself will this part of the photo be blurry, sharp, will it appear like an anomaly ? If so change your position, shoot from a different angle, or find a better location to take the shot. This also happened with another shot I took of some houses with a few weeds in front blowing in the wind, when I got home the weeds looked like anomalies and not weeds at all. Again this happened right in the center of the shot, thus ruining what may have been a really cool photo.

So my first suggestion to anyone new, and the first lesson I've learned is look at your surroundings. When looking through the view finder, ask yourself how the little things like road signs, and weeds, or trees are going to effect the overall image and take into consideration the objects that are blowing around in the wind, how hard the wind is blowing, and how you think the movement from the wind will effect the sharpness of the image.
Saturday, January 5, 2013
Catching The Feel Of The Day
I've been trying to take a few pictures a day. For the most part I shoot anything available. Yesterday was a dark snowy day and I needed to go to the store for some groceries. So I grabbed the camera, went to the store and took a few shots around the grocery store parking lot, and headed home. I really wanted to try and capture the feel of the day with my camera. Not satisfied with what I shot in the parking lot of the grocery store, I decided to stop by the train yard at the corner of my street.
This is the first photo I took since I got the camera that I feel captures the mood of the moment. The cold , dark , snowy day it was, I think was captured in black and white. I also just learned how to find monochrome mode in my camera. LOL. A total amateur for sure.

As I was finishing up, I put the camera in color mode to snap some graffiti shots, and a plow drove by. I snapped a picture in color and was pretty happy with the results. I'm trying to shoot all my photo's using the rule of thirds. I think I'm getting that concept. I used to always try and center my subject matter and after doing some research and some experiments I realize how centering every shot can take away from the moment.
 I'm still shooting in jpeg I just haven't learned enough about post processing yet to feel comfortable shooting in raw. I did have the camera set to A mode which I guess adjusts the aperture, but I don't know what aperture I was shooting in. Learning all the time. I'll start keeping better track of that stuff as I learn more. Both photo's are posted as shot, and I did no photo editing in Gimp other than scale them down from the original size.
This is the first photo I took since I got the camera that I feel captures the mood of the moment. The cold , dark , snowy day it was, I think was captured in black and white. I also just learned how to find monochrome mode in my camera. LOL. A total amateur for sure.

As I was finishing up, I put the camera in color mode to snap some graffiti shots, and a plow drove by. I snapped a picture in color and was pretty happy with the results. I'm trying to shoot all my photo's using the rule of thirds. I think I'm getting that concept. I used to always try and center my subject matter and after doing some research and some experiments I realize how centering every shot can take away from the moment.

Ansel Adams - One Of My Favorites
One of my favorite photographers has to be Ansel Adams. I love the way he makes some scenes look almost other worldly. I'm also such a big fan of black and white. Ansel was the master of outdoor black and white photography !
 If you would like to learn more about Ansel Adams you can click here for a wiki.
Here's another great article about him written by the Sierra Club.
If you would like to check out some of Ansel Adams work, or if your not familiar with him, I found a great library of his various works hosted in the National Archives. You can see some of this photography here.

Here's another great article about him written by the Sierra Club.
If you would like to check out some of Ansel Adams work, or if your not familiar with him, I found a great library of his various works hosted in the National Archives. You can see some of this photography here.
Friday, January 4, 2013
Ominous Clouds
This was one of the last photo's I took with my old camera. I love the way this came out. It was taken with an old Sony Mavica digital camera.
I went for a walk at one of the area nature preserves around the beginning of autumn. I took a ton of pictures but there were only a few I thought were decent. This photo was taken in sepia mode, then edited in Gimp with the decor/old photo/ filter. Because it was originally shot in Sepia I just added the border at 20 and the mottle effect. This was the end result.

I went for a walk at one of the area nature preserves around the beginning of autumn. I took a ton of pictures but there were only a few I thought were decent. This photo was taken in sepia mode, then edited in Gimp with the decor/old photo/ filter. Because it was originally shot in Sepia I just added the border at 20 and the mottle effect. This was the end result.

Tuesday, January 1, 2013
The Boring Cat Pic
Here's a boring cat picture. Shot with a 16 - 55 mm lens. Cropped in Gimp, and then I adjusted the Brightness and Contrast a bit. When I brought the brightness up just by like 3 and contrast down by 2 it really made the black and white of his fur stand out.


About this blog.
I'm a forty five year old male, living in Western N.Y. who has always had an interest in photography but never really pursued it. I received a Nikon D3000 for Christmas this year. I decided to learn everything I can about amateur photography, and taking pictures in general. At the time of this writing I really have no clue as to what I'm doing. This blog is a record of my journey through amateur photography and learning the ins and outs of taking decent pictures.
I plan on posting my pictures as a record of improvement. I also plan on posting any notes on taking pictures, links to informative sites that help improve my photography and whatever else I think will be useful.
I plan on posting my pictures as a record of improvement. I also plan on posting any notes on taking pictures, links to informative sites that help improve my photography and whatever else I think will be useful.
One Of My First Pictures

I'm currently shooting in auto mode, and this pic was taken with a 55 - 200 mm lens.
Subscribe to:
Comments (Atom)